 code前端网
CentOS7 yum安装,访问配置使用yum安装,访问配置和PostgreSQL9.6
postgresql简单使用。
1。确认环境
1.操作系统
CentOS-7-x86_64-Everything-1511
2。 PostgreSQL 版本
PostgreSQL 9.6.3:
II。安装
1.安装 rpm
2。安装客户端
[root@psql_master ~]# yum install -y postgresql96
3。安装服务器
#yum安装postgresql,默认会建一个名为”postgres”的系统账号,用于执行PostgreSQL;
#同时数据库中也会生成一个名为”postgres”的数据库用户,且密码已自动生成,需要进入数据库后修改;
#PostgreSQL在数据库用户同名的系统账号下登录免密。
[root@psql_master ~]# yum install -y postgresql96-server
4。初始化
[root@psql_master bin]# /usr//postgresql96-setup initdb
5。设置启动
[root@psql_master ~]# systemctl enable postgresql-9.6
6。开始
[root@psql_master ~]# systemctl start postgresql-9.6
III.配置使用
1。更改用户密码
#yum安装postgresql,默认会建一个名为”postgres”的系统账号,用于执行PostgreSQL;
[root@psql_master ~]# su - postgres#切换用户后,提示符变更为“$”;
#同时数据库中也会生成一个名为”postgres”的数据库用户,且密码已自动生成;
#PostgreSQL在数据库用户同名的系统账号下登录免密;
$ psql -U postgres

#进入数据库后修改密码;
postgres=# alter user postgres with password 'postgres@123'
![]()
2.允许远程访问
#配置文件中,默认只能本机访问postgresql;
#修改listen_addresses = 'localhost'为listen_addresses = '*',允许所有远程访问;
#修改配置文件需要重启服务。
[root@psql_master ~]# sed -i "s|#listen_addresses = 'localhost'|listen_addresses = '*'|g" /var/lib/pgsql/9.6/data/postgresql.conf
3。主机身份验证
#在第82行之后,”IPv4 local connections”下新增允许的客户端;
#“host” 代表主机类型,第一个“all”代表db ,第二个“all”代表user ,“” 代表client ip,“trust”代表认证方式;
#认证方式除“trust”外,还有“peer”, “ident”, “md5”, “password”等,具体可参考pg-hba文件: https://www.postgresql.org/docs/current/static/auth-pg-hba-conf.html
#修改文件需要重启服务。
[root@psql_master ~]# vim /var/lib/pgsql/9.6/data/pg_hba.confhost    all             all                       trust
![]()
4。设置环境变量
[root@psql_master ~]# vim /etc/profile
export PATH=$PATH:/usr/pgsql-9.6/bin

[root@psql_master ~]# source /etc/profile
5。重新启动服务
[root@psql_master ~]# systemctl restart postgresql-9.6
6。 iptables
#postgresql默认开启tcp5432端口
[root@psql_master ~]# vim /etc/sysconfig/iptables
-A INPUT -m state --state NEW -m tcp -p tcp --dport 5432 -j ACCEPT

[root@psql_master ~]# service iptables restart
IV 。使用确认
1。显示端口
[root@psql_master ~]# netstat -tunlp
![]()
2。易于使用
1) 创建用户
postgres=# create user postuser1 with password 'user1@123';
2) 创建数据库
#同时指定数据库的所有者
postgres=# create database postdb1 owner postuser1;
3) 数据库授权
#未赋权则账户只能登录控制台
postgres=# grant all privileges on database postdb1 to postuser1;
![]()
4) 登录创建新数据库
#在操作系统层使用新建的账号登录新建的数据库,登录后提示符为“postdb1=>”;
#如果在postgres账户下直接使用“postgres=# \c postdb1;”登录,则登录用户依然是postgres,
$ psql -U postuser1 -d postdb1 -h 127.0.0.1 -p 5432
![]()
5) 创建表
#在操作系统层使用新建的账号登录新建的数据库,登录后提示符为“postdb1=>”;
#如果在postgres账户下直接使用“postgres=# \c postdb1;”登录,则登录用户依然是postgres,
$ psql -U postuser1 -d postdb1 -h 127.0.0.1 -p 5432
![]()
5) 7)调查
postdb1=>select * from tb1;
![]()
3。 pgadmin连接postgresql
pgadmin下载地址:
版本5/19/2017为:pgAdmin 4 v1.5
1)添加服务器新服务器普通标题)名称自定义—>(连接标签) )根据需要填写主机名和postgresql用户密码,其余可以使用默认配置—>保存。 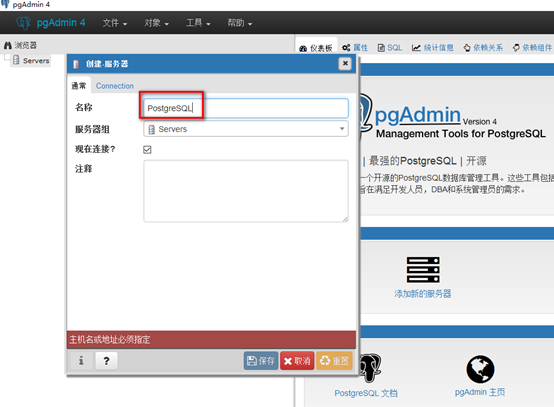
![]()
2) 图形查看
![]()
版权声明
本文仅代表作者观点,不代表Code前端网立场。
本文系作者Code前端网发表,如需转载,请注明页面地址。
